Image Slideshows with Transitions
An essential component of internet-based communications is the digital photograph. Nearly every website incorporates the use of images as a means conveying information and emotional messages. The adage by Fred R. Barnard remains true and relevant today: A picture is worth a thousand words.
So some things never change. But, what has changed is how you can display collections of images. With technologies like HTML5 and devices like the iPad, you can now create attractive interactive slideshows that incorporate video-like transitions like dissolving from one image into the next.
This article will explain the structures and methods used to create basic HTML5 slideshows with transitions, ideal for displaying your images with flair!
The Technique
Although you won't have to actually write the JavaScript and CSS required to create these example slideshows with effects (you can copy and paste the provided sample code), it’s still important to understand the techniques involved.
The slideshow examples all use the same techniques of using JavaScript to trigger transition effects to images by applying CSS stylesheets to the images and their container elements. These are the steps:
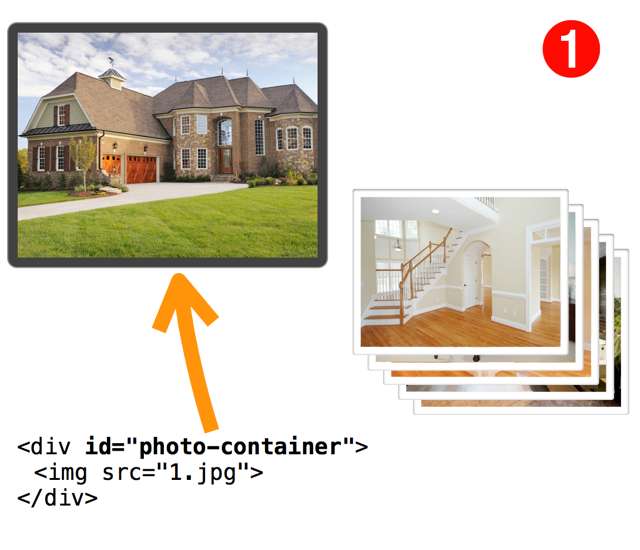
- The webpage hosting the slideshow will contain a DIV element that will act as the container for the slideshow. In standard HTML, a DIV is a block-level element that visually isolates a section of a document on a webpage. A DIV can contain other DIVs, SPANs, images, videos, etc. The slideshow DIV will be assigned a unique indentifer (id) that will enable the JavaScript controllers to locate it on the page. Also, the slideshow DIV will initially contain a single image.
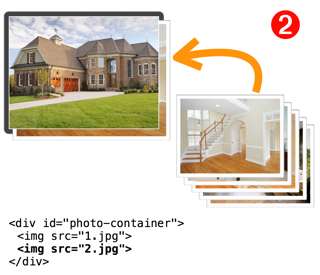
- When triggered, the slideshow JavaScript script will begin by adding the next image to be shown in the slideshow, to the slideshow container. It is placed in the DIV but behind the current image.
- Next, the script assigns CSS classes to the slideshow container and each of the images it contains. These CSS classes define the initial states and properties of the elements prior to applying the transition.
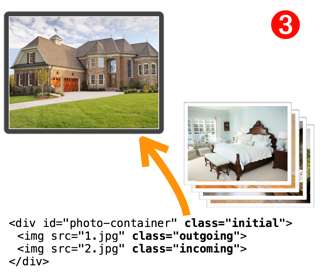
- The transition effect is triggered by changing the CSS stylesheet class of the container to a second CSS stylesheet. When the container style class is changed, the browser applies the indicated transition type (in this case a cross-dissolve) to the image elements in the manner and timing described in the CSS classes.
- When the transition has completed, the script cleans up by removing the original image from the container and resetting the slideshow container back to its default state (no assigned class).

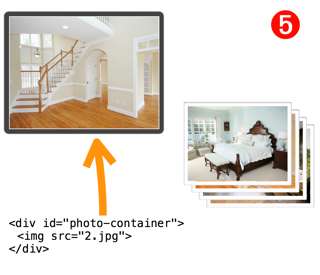
The result is an attractive transition between the two images and the slideshow is ready for the user to proceed to the next image. These steps are repeated each time the user activates the slideshow trigger.
Adapting the Examples for Use
You can easily adapt the examples for use in your projects. Simply copy the source code of the transition example you want to implement, and perform these procedures:
- Make sure your images are named numerically and in sequence: i.e. 1.jpg, 2.jpg, 3.jpg, 4.jpg, etc.
- Edit the value of the imageCount variable in the JavaScript script so that it matches the number of images your slideshow will contain.
- If your images are not scaled to 640 x 480, then edit the width and height properties of the #photo-container CSS stylesheet at the top of the source to match the dimensions of your images. (NOTE: if you are using the cube transition, be sure to edit the other CSS stylesheet to account for the new image width)
- If your images are not placed in the same folder as the webpage source file, adjust the value of the incomingImage.src variable in the script to reflect the new path, like this:
incomingImage.src = 'path/to/image/folder/' + nextImageFilename; - Make sure that the JavaScript script for preloading the images contains these two lines for every image:
var image8 = new Image();
image8.src = "8.jpg";
That’s all that is necessary to have a slideshow with CSS transitions!